- July 6, 2020
- Posted by: admin
- Category: Microsoft, Office365, SharePoint, SharePoint Framework
In the previous part of the blog (Part One), we learned what SharePoint Framework is and the goodies that come with it. In this section, we will explore how to set up our SharePoint development environment to ensure efficient development.
Setting Up your SharePoint Framework Development
To use SharePoint Framework, you will need the following:
- Office 365 Tenant
- Developer site collection for testing your solution
- An app catalog site to upload and deploy your solutions
- SharePoint online workbench.
You can signup for the developer program to get a free Office 365 Tenant!
Installations
Install NodeJS
Browse to NodeJS website and download the most stable version (It must be above v8.11.4)

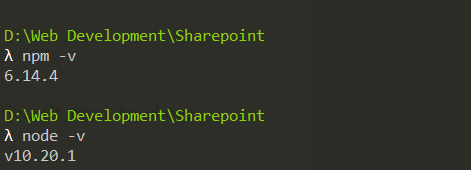
Confirm if your installation was successful by typing the following commands in your terminal/Windows PowerShell
Node -v (this checks node version)
Npm -v (checks the Npm version)
Install a code editor
Below are great editors you can use to have a google experience with SPFx
I prefer Visual Studio Code due to its awesome plugins available and tools that can help me get started quickly.
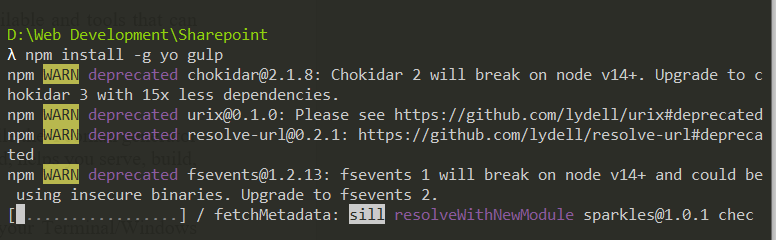
Install Yeoman and gulp
Yeoman is an excellent tool that helps set up your new project while the Yeoman generator helps to create a new webpart in the SPFx. Gulp, on the other hand, helps you serve, build, and package your application.
To install Yeoman and gulp, enter the following command in your Terminal/Windows PowerShell
npm install -g yo gulp
To install the Yeoman SharePoint generator, enter the following command:
npm install -g @microsoft/generator-SharePoint

With these few setup steps, you will be ready to develop using the SharePoint Framework. In the next section, we will start building our first SPFx solution.